1. Open https://spibo.in/
2. Click Register on the right side of the homepage.
3. Fill in your details in the Register as a Customer form.
4. Check the box for I agree to the Terms & Policy.
5. Click the Sign Up button to complete your registration.
6. After registration, you will receive a welcome email at your registered email address.
1. Open https://spibo.in/
2. Click Register on the right side of the homepage.
3. Fill in your personal and company details in the Register as a Vendor form.
4. Check the box for I agree to the Terms & Policy.
5. Click the Sign Up button to complete your registration.
6. After registration, you will receive a welcome email at your registered email address.
1. Open https://spibo.in/
2. Click Login on the right side of the homepage.
3. Enter your Email Address and Password in the login form.
4. Click the Login button.
5. You will be logged into your SPIBO account.
1. Visit https://spibo.in/login and log in to your account using your Email address and Password.
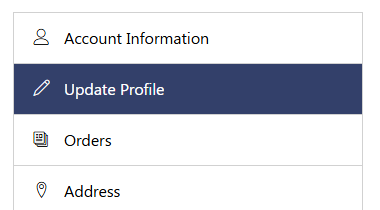
2. Once logged in, click the User Icon on the right side to update your profile.
3. In the left-side menu, click on the Update Profile section.
4. Update your details and upload the required personal and company documents to request access to the vendor dashboard.
5. Click the Update button to submit your request for approval by the SPIBO team.
6. Once your profile is approved, you will receive a Verification Email at your registered email address.
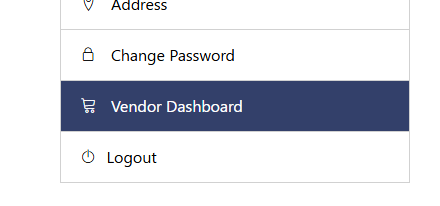
7. After approval, the Vendor Dashboard will appear in the menu, allowing you to access vendor features.
1. Visit https://spibo.in/login and log in to your account using your Email address and Password.
2. Once logged in, click the User Icon on the right side to update your profile.
3. In the left-side menu, click on the Update Profile section.
4. Add or update your Name, Date of Birth, Email Address, and Phone Number in the Profile form.
5. Click on the Update button to save your details.
1. Visit https://spibo.in/login and log in to your account using your Email address and Password.
2. Once logged in, click the User Icon on the right side to access your profile.
3. In the left-side menu, click on the Vendor Dashboard.
4. In the Vendor Dashboard, navigate to the Update Profile section in the left-side menu.
5. In the Update Profile section, you can add or update your Company Details and Bank Details.
6. Click the Save Settings button to save all changes.
1. Visit https://spibo.in/login and log in to your account using your Email address and Password.
2. Once logged in, click the User Icon on the right side to access your profile.
3. In the left-side menu, click on the Vendor Dashboard.
4. In the Vendor Dashboard, navigate to the Products section in the left-side menu.
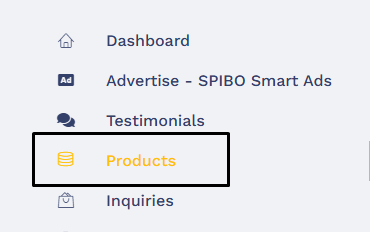
5. To add a product, click the Create button.
6. In the Create section, enter product details such as Price, Images, Description, Business type, and Category, then submit it for approval by the SPIBO team.
7. You can also edit your existing products from the Products table.
1. Visit https://spibo.in/login and log in to your account using your Email address and Password.
2. Once logged in, click the User Icon on the right side to access your profile.
3. In the left-side menu, click on the Vendor Dashboard.
4. In the Vendor Dashboard, navigate to the Services section in the left-side menu.

5. To add a service, click the Create button.
6. In the Create section, enter service details such as Name, Images, Description, Business type, and City then submit it for approval by the SPIBO team.
7. You can also edit your existing services from the Services table.
1. Visit https://spibo.in/login and log in to your account using your Email address and Password.
2. Once logged in, click the User Icon on the right side to access your profile.
3. In the left-side menu, click on the Vendor Dashboard.
4. In the Vendor Dashboard, you will see the available Franchise Subscription Plan.

5. Click the Subscribe button to proceed with the payment.
6. A Payment Window will open complete the payment to activate your subscription.
7. Once the payment is successful, your franchise plan will be activated.
1. Visit https://spibo.in/login and log in to your account using your Email address and Password.
2. Once logged in, click the User Icon on the right side to access your profile.
3. In the left-side menu, click on the Vendor Dashboard.
4. In the Vendor Dashboard, you will see the available Venture Capital Subscription Plan.
5. Click the Subscribe button to proceed with the payment.
6. A Payment Window will open complete the payment to activate your subscription.
7. Once the payment is successful, your venture capital plan will be activated.
1. Visit https://spibo.in/login and log in to your account using your Email address and Password.
2. Once logged in, click the User Icon on the right side.
3. In the left-side menu, click on the Vendor Dashboard.
4. In the Vendor Dashboard, navigate to the Inquiries section in the left-side menu.
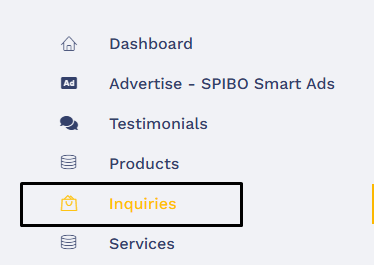
5. In the Inquiries section, you can view all product-related inquiries along with their details. You can also export inquiry data using the Export button in the table.

6. Similar to product inquiries, there are separate sections for Service Inquiries, Startup Inquiries, and Venture Capital Inquiries, where you can access related inquiry details.